I thought that to day i would try to talk you through the process of lino-printing.
I get quite a few inquiries as to what the process involves, so here is an explanation of simple monotone (one colour only) printmaking. Coupled with photographs of each stage.
(i will, at a later stage show the more complicated process of full colour lino-printing.)
Firstly i cut the linoleum to the desired size. This is printmakers linoleum produced in Kirkaldy, Fife, in Scotland. It is traditional hessian backed linoleum manufactured specifically for printmaking.
I then transfer my image onto the lino, either by drawing it free hand or transferring it from my sketch directly to the lino using carbon paper. ( in this instance i drew it freehand).
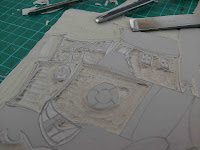
Then using a series of lino cutting tools i carve into the linoleum.
The important thing to remember at this stage is that where ever you cut/mark with the tools will remain white, so it is the opposite of drawing with a pencil. Since when you draw with a pencil it is the marks you make which create the image but with lino printing it is what you leave behind that make the image.
Lino cutting tools come in two styles, a V tool and a gauge tool. As the name suggests the V tool makes V shaped marks and the gauge tool, U shaped marks. They come in a variety of sizes from tiny, little narrow to wide open tools and different patterns and textures can be achieved using a variety of tools.
A true craftsman uses the entire spectrum of tools and has mastered the ability to use the tools to create beautiful imagery.
Through this process much of the linoleum is cut away and what is left is that which will be inked up. Using, linseed oil based, ink and a roller ink is then applied to the relief surface of the linoleum.
At this point it is all to easy to "over ink" the lino. This means that you have too much ink on the roller and you will flood the smallest of the channels which have been carved into the surface, thus losing the details in the image. Although practice and experience is the simple way to combat this rookie mistake, my printmaking lecturer used to always say that when inking up your roller it should make a "hisp sound, like an egg frying in a pan" : )
This the stage at which all your hard ,( but thoroughly enjoyable !) work nows pays off.
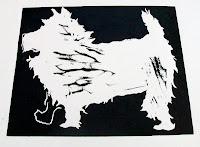
The lino must now come into contact with paper to create a print.
This can be done using a printing press or it can be hand burnished.
Luckily i have access to a beautiful printing press, which is 170 years old, in perfect working order and an absolute joy to use. (now that's my idea of sustainable design)
To hand burnish a print all that is needed is a very simple implement, for example the back of a spoon will work beautifully. Pressure is applied by rubbing the lino through the paper and voila, the image is transfered.
This is the most exciting point of the entire process since you have no real idea of what the print will look like until you peel back that piece of paper and then ...
i do love printmaking.


